CHIP-8 Cocoa Port part 1
I’ll go through the steps to build the emulator as a Cocoa Application. These steps are correct as of OS X 10.7 Lion and XCode 4.2. I’m not doing anything exotic, and I think most of these instructions will work fine back to OS X 10.5 or even before.
I’m going to build the Cocoa application with 3 pieces.
-
Emulator - I’ll use the chip8emu.c file that I’ve developed up to now as the emulator.
-
Platform - I’ll put the platform code in an NSOpenGLView which can draw to the window and get key events.
-
Machine code - An NSObject that implements the machine and hooks the platform to the CPU.
-
Instantiate and call the 8080 emulator
- matching the emulator speed to the machine speed
-
Manage the CHIP-8 timer registers
Here are step by step instructions:
Project
-
Open XCode and create a new project - choose Mac OS X, Application, then Cocoa Application. Click Next.
-
Use "Chip8" (or whatever you want) for the Product name.
-
Uncheck “Create Document-Based Application”. Click Next.
-
Choose a location, then click "Create".
Make an NSView and edit the XIB
-
File->New File...
-
In the Mac OS X section, select Cocoa, then choose Objective-C class. Click Next.
-
Name the class - I called mine “Chip8View”. Make it a subclass of NSView. Save the file.
-
In the project window, click on the “MainMenu.xib” file.
-
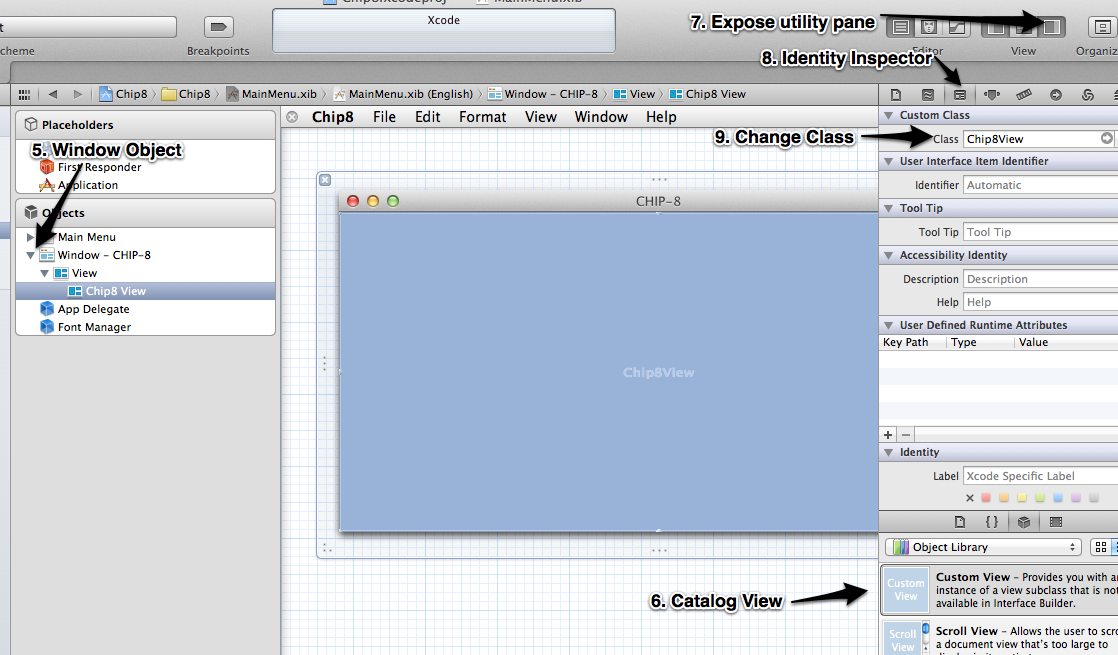
In the “Objects” area, click the “Window - Chip8” flippy triangle. (Consult the view below for a visual.)
-
In the Catalog View, find a CustomView and drag it into the Window.
-
Expose the Utilities pane
-
Click the “Identity Inspector”
-
Change the Class to Chip8View
-
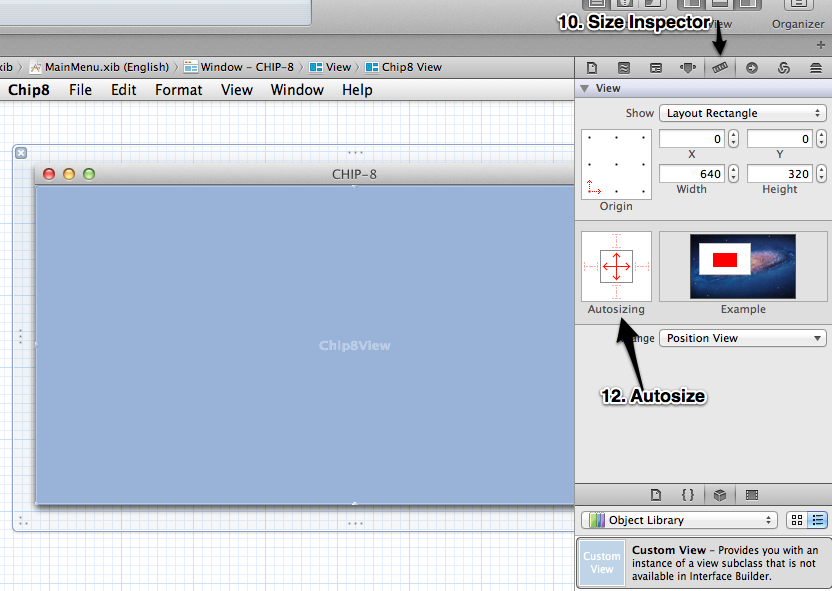
Click the Size Inspector. Change the size to Width: 640 Height:320
-
In the windows area, drag the view around until the blue alignment lines show you that the view is centered.
-
Adjust the Autosizing area so the view will stay pinned to the sides of the window. (You could also ajust the window’s settings so it can’t be resized.)
Machine object
Make a new file to put the machine code in
-
File->New File...
-
In the Mac OS X section, select Cocoa, then choose Objective-C class. Click Next.
-
Name the class - I called mine “Chip8Machine”. Make it a subclass of NSObject.
-
Save the new class.
Add the OpenGL Framework
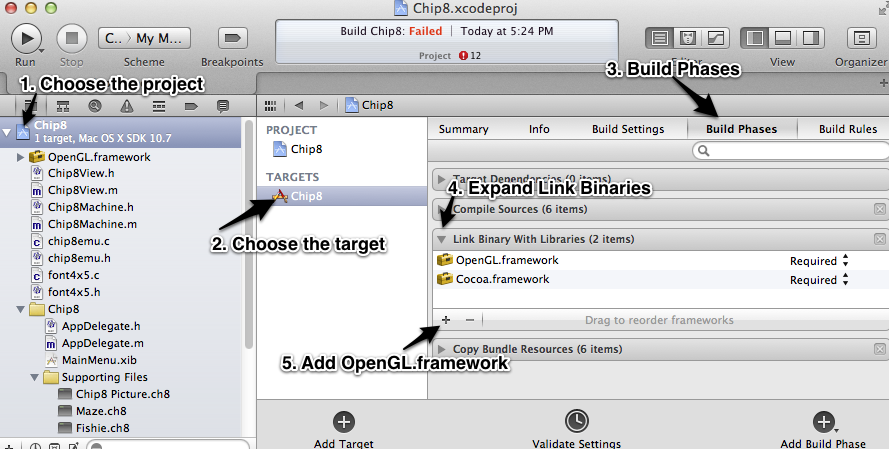
Since the Cocoa Port will use OpenGL for the display, we have to add the OpenGL framework.
-
Click the Chip8 project
-
Choose the Chip 8 target
-
Click on Build Phases
-
Expand the Link Binary With Libraries section
-
Click on the + and choose OpenGL.framework from the list
Other files
I'm going to add a couple of CHIP-8 programs into the project. You can get these from several places on the internet including http://chip8.com/. These seem to be public domain so I'm going to include them in the download. (Please contact me if you know differently.)
I'll add Fishie, CHIP-8 Picture, and Maze. Simply drag them into the "Supporting Files" folder in your project. XCode will know these are resources and will put them in your app's bundle. You shouldn't have to do anything to the project settings to make that happen.
Also add in your chip8emu.c and .h files. (If you haven't made a .h file yet, create it now. You'll want to move the Chip8State structure definition there, as well as define the APIs.) I also made a .c and .h file for my font definition, although you could put that in the emulator's .c file.
← Prev: chip-8-sprites Next: chip-8-port-pt-2---machine-object →Post questions or comments on Twitter @realemulator101, or if you find issues in the code, file them on the github repository.