Cocoa Port pt 1 - Setting up the project
I'll go through the steps to build the emulator as a Cocoa Application. These steps are correct as of OS X 10.10 El Capitan and XCode 7.2. I'm not doing anything exotic, and I think most of these instructions will work fine back to OS X 10.5 or even before with common sense modifications.
I'm going to build the Cocoa application with 3 pieces.
-
Emulator - I'll use the 8080.c file that we've developed up to now as the emulator.
-
Platform - We'll put the platform code in an NSView which can draw to the window and get key events.
-
Machine code - An NSObject that implements the machine and hooks the platform to the CPU.
-
Instantiate and call the 8080 emulator
- matching the emulator speed to the machine speed
-
Implement the IN and OUT calls
-
Connect the keyboard events to the controls
-
Play sounds
-
Implement Space Invader's external shift register
-
Here are step by step instructions:
Project
-
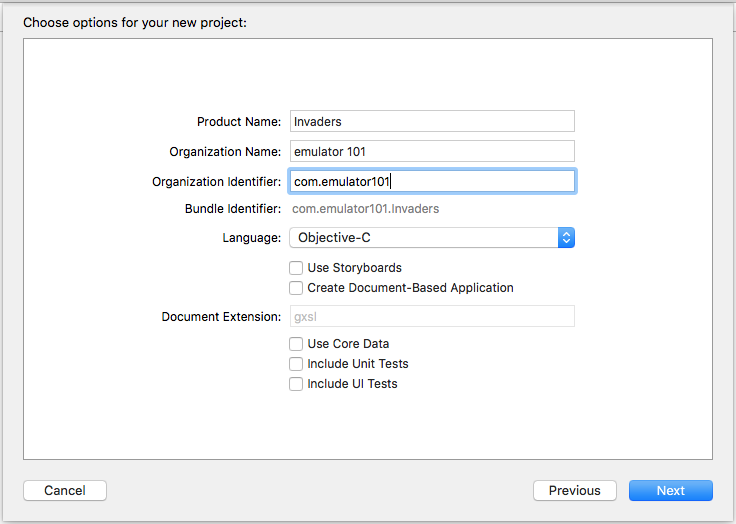
Open XCode choose OS X -> Application -> Cocoa Application, then click "Next"
-
Fill in information, making sure to uncheck "Create Document-Based Application"
-
Name your project and click Next
-
Choose a place to save your project
View
Make a NSView to draw the game screen and receive the Cocoa input events.
-
File->New File...
-
In the OS X section, select Source, then choose Cocoa Class. Click Next.
-
Name the class - I called mine "InvadersView". Make it a subclass of NSView. Save the file.
-
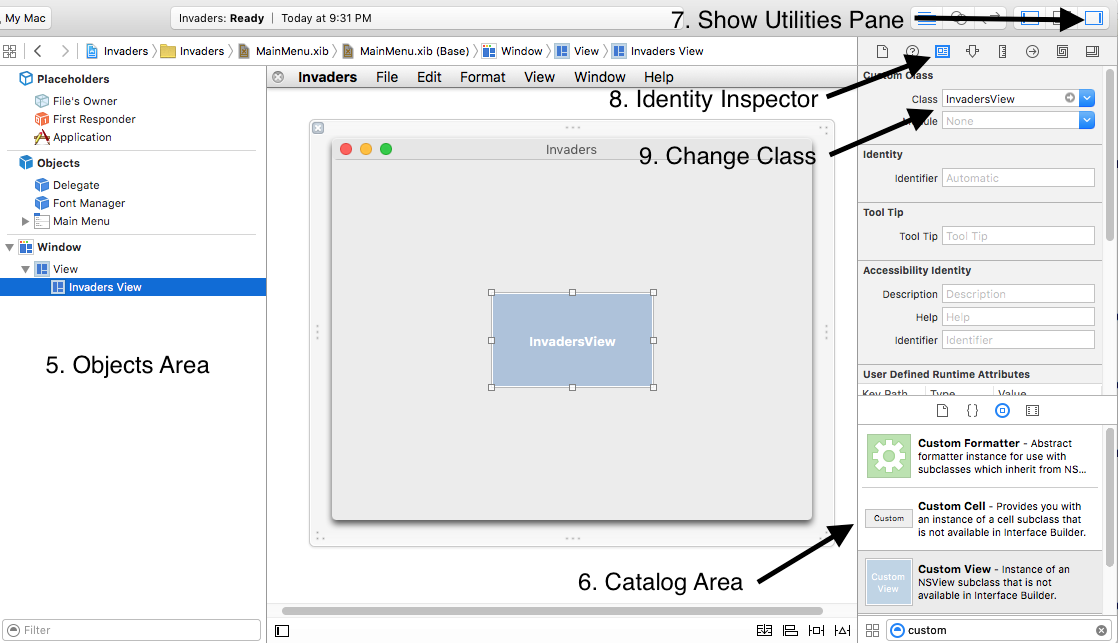
In the project window, click on the "MainMenu.xib" file.
-
In the "Objects" area, click the "Window - Invaders" flippy triangle. (Consult the view below for a visual.)
-
In the Catalog View, find a Custom View and drag it into the Window.
-
Expose the Utilities pane
-
Click the "Identity Inspector"
-
Change the Class to InvadersView
-
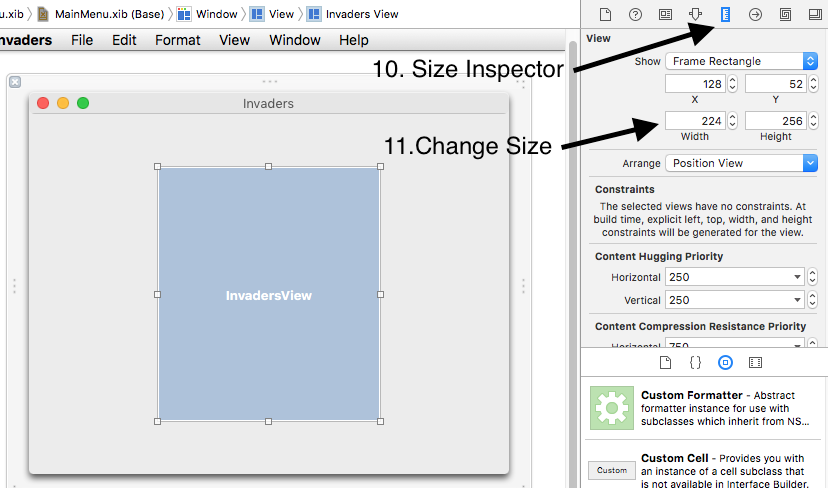
Click the Size Inspector
-
Change the size to Width: 224 Height:256
-
In the windows area, drag the view around until the blue alignment lines show you that the view is centered.
-
Steps 13 and 14 are in the movie below. Click on the Invaders view, then click on Pin popup menu. Check the checkboxes for width and height which should already be set to 224, 256 from step 11.
-
Finally, with the Invaders view still selected, control click from the Invaders view to the window's view and choose Center in each direction.
Machine
-
File->New File...
-
In the OS X section, select Source, then choose Cocoa Class. Click Next.
-
Name the class - I called mine "SpaceInvadersMachine". Make it a subclass of NSObject.
-
Click Next, then save the files. They should get automatically added to the project.
Other Files
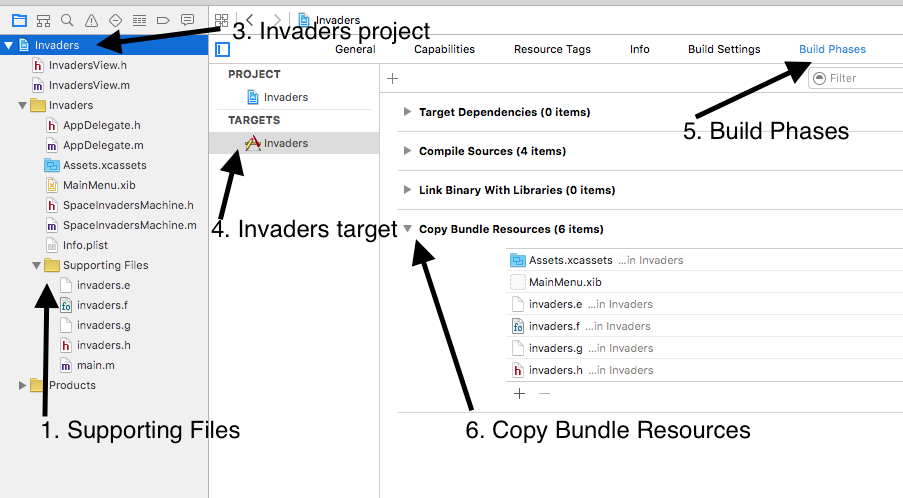
I put the ROM files into the project so they get copied to the Application's bundle when it gets built.
-
Drag the invaders.e, .f, .g, and .h files into the project, right into the Supporting Files group
-
In the Choose options sheet, check Copy items if needed, and make sure Invaders is not checked in Add To Targets
-
Click on the Invaders project in the project browser
-
Click on the Invaders target
-
Click on Build Phases
-
Disclose Copy Bundle Resources
-
Drag invaders.e, .f, .g, and .h into the Copy Bundle Resources area
This completes the setup of your project. We'll make this work in 3 stages:
-
Machine gets CPU, timer, and framebuffer sharing functions. Platform code will display the machine's framebuffer image on a timer.
-
Add keyboard handling to machine and platform.
-
Play sounds from machine.
Post questions or comments on Twitter @realemulator101, or if you find issues in the code, file them on the github repository.