iPhone Port pt 3 - ViewController.m
In the previous section we made the machine shell for the emulator. This section will write the code to put the game's image into the window.
The GameViewController.m file from the template has a great division of labor for what needs to be done. There is a setup routine, and update routine, and a draw routine. That perfectly aligns with what I need to do.
In the setup routine, I'll create a texture, a shader, and the geometry used to draw the game screen. I'll also start the machine emulator there. As the machine emulator runs, it updates the image of the game in the machine's memory. In update, I'll animate the game by copying the game's current image into a texture. Finally, in the template's drawInRect, I'll draw the texture.
Edit the GameViewController Template
I need to remove the rotating cube code and everything that references it, but leave enough code to draw a . Here's a list of what I'm going to delete out of the template. When I get done, the template will still compile, it's just going to draw a square.
-
Remove the
// Uniform index.section. I'm not going to use this. -
In
// Attribute index., ReplaceATTRIB_NORMALwithATTRIB_TEX_COORD. -
I'm going to remove
gCubeVertexDatahere because I'm going to calculate the vertices I want to draw. I'll move this array into the template's setupGL. -
I'll remove the reference to the GLKBaseEffect.
-
I'll modify the template's setupGL as follows.
- (void)setupGL
{
[EAGLContext setCurrentContext:self.context];
[self loadShaders];
//The viewport of the template is a view stretched from corner to corner
// of the screen. I know I'll be in portrait (long side of the phone
// up. But since I don't know what phone I'm on, I don't know the ratio
// of height to width that will maximize the viewable space. This code
// figures that out, and adjusts the values of the position to account
// for that.
//
//
float screenAspect = fabs(self.view.bounds.size.width / self.view.bounds.size.height);
float invadersAspect = 224.0/256.0;
float aspect = screenAspect / invadersAspect;
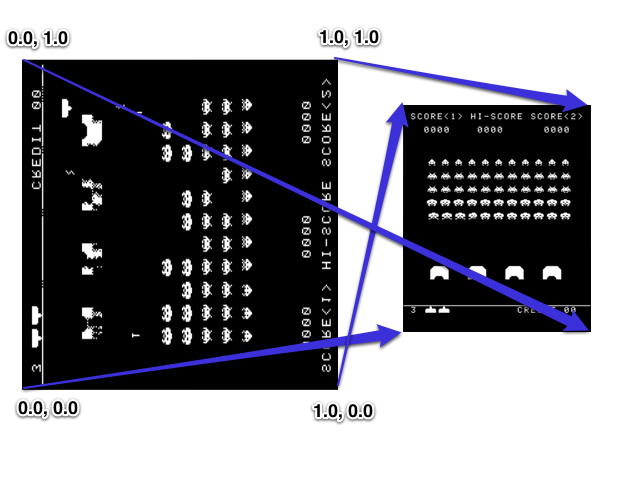
GLfloat gGameVertexData[] =
{
// Data layout for each line below is:
// positionX, positionY, texture coord s, texture coord t,
// v3---v4
// | \ |
// | \ |
// | \ |
// v1---v2
-1.0f, -aspect, 0.0f, 0.0f,
1.0f, -aspect, 0.0f, 1.0f,
-1.0f, aspect, 1.0f, 0.0f,
1.0f, aspect, 1.0f, 1.0f,
};
glGenVertexArraysOES(1, &_vertexArray);
glBindVertexArrayOES(_vertexArray);
glGenBuffers(1, &_vertexBuffer);
glBindBuffer(GL_ARRAY_BUFFER, _vertexBuffer);
glBufferData(GL_ARRAY_BUFFER, sizeof(gGameVertexData), gGameVertexData, GL_STATIC_DRAW);
glEnableVertexAttribArray(0);
glVertexAttribPointer(0, 2, GL_FLOAT, GL_FALSE, 16, BUFFER_OFFSET(0));
glEnableVertexAttribArray(1);
glVertexAttribPointer(1, 2, GL_FLOAT, GL_FALSE, 16, BUFFER_OFFSET(8));
//texture setup code
// ....
invaders = [[SpaceInvadersMachine alloc] init];
[invaders startEmulation];
}
Since I know this code in the template is only called once at the beginning of time, it is a good place to start the emulator. The last 2 lines do that.
Texture Setup
As the machine emulator runs, it updates the image of the game in the machine's memory. To get the new image to the screen, I need to give the current screen image to OpenGL. We know the machine's display is a 1 bit per pixel bitmap. So on the GL side, I'll choose a texture of type GL_LUMINANCE for this. A luminance texture is a grayscale image, and this is a match to black & white we have. It is also the smallest data type I can get away with (one byte per pixel) so it should give the best performance.
From our previous study, we know that the screen is 224 pixels wide and 256 pixels tall, and that it is rotated in memory. Since the iPhone's OpenGL ES2 implementation allows us to do it, we'll just create a 2D texture of that size.
I'll add this texture setup code to the setupGL call above
           buffer8 = calloc( 256*224, 1);
           memset(buffer8, 0xCC, (256*224));
           //Define the texture
           GLuint textureID;
           glGenTextures(1, &textureID);
           glBindTexture(GL_TEXTURE_2D, textureID);
           glTexImage2D(GL_TEXTURE_2D, 0, GL_LUMINANCE, 256, 224, 0, GL_LUMINANCE, GL_UNSIGNED_BYTE, buffer8);

           //Set the texture to use linear sampling.  The upside is it will
           // be scaled and smoothed.  The downside is that the smoothing will
           // make it look blurry.  Try "GL_NEAREST" instead of "GL_LINEAR" and
           // see if you like it better.
           glTexParameteri(GL_TEXTURE_2D, GL_TEXTURE_MIN_FILTER, GL_LINEAR);
           glTexParameteri(GL_TEXTURE_2D, GL_TEXTURE_MAG_FILTER, GL_LINEAR);
           //Since the texture is 224 high (so not a power of two), the wrap
           // mode most be GL_CLAMP_TO_EDGE
           glTexParameteri(GL_TEXTURE_2D, GL_TEXTURE_WRAP_S, GL_CLAMP_TO_EDGE);
           glTexParameteri(GL_TEXTURE_2D, GL_TEXTURE_WRAP_T, GL_CLAMP_TO_EDGE);

           //Tell the shader which texture to sample
           GLuint tsamplerUniformLocation = glGetUniformLocation(_program, "tsampler");
           glUniform1i(tsamplerUniformLocation, 0);
Since we know the screen is rotated in memory, the easiest way to straighten that out is to just adjust the texture coordinates in the vertex buffer, which I've done in the setup code.
Screen Update
The game template calls us to animate the game's scene. For the emulator, this means updating the screen. When update is called, I'll copy the game's image and expand it from 1 bit-per-pixel to 8 bits-per-pixel. (One byte of game image makes 8 bytes in the texture.) Then, I'll update the texture's contents using glTexSubImage2D.
   - (void)update
   {
       int i;
       uint8_t *b8 = buffer8;
       uint8_t *fb = [invaders framebuffer];

       for (i=0; i < ((256/8)*224); i++)
       {
           uint8_t bw_pix = fb[0];
           if (bw_pix & 0x01) b8[0] = 0xFF; else b8[0] = 0;
           if (bw_pix & 0x02) b8[1] = 0xFF; else b8[1] = 0;
           if (bw_pix & 0x04) b8[2] = 0xFF; else b8[2] = 0;
           if (bw_pix & 0x08) b8[3] = 0xFF; else b8[3] = 0;
           if (bw_pix & 0x10) b8[4] = 0xFF; else b8[4] = 0;
           if (bw_pix & 0x20) b8[5] = 0xFF; else b8[5] = 0;
           if (bw_pix & 0x40) b8[6] = 0xFF; else b8[6] = 0;
           if (bw_pix & 0x80) b8[7] = 0xFF; else b8[7] = 0;
           b8 += 8;
           fb++;
       }

       glTexSubImage2D(GL_TEXTURE_2D, 0, 0, 0, 256, 224, GL_LUMINANCE, GL_UNSIGNED_BYTE, buffer8);
   }
Shaders
Since this game template uses OpenGL ES 2, it has to use shaders.
The vertex shader is responsible for transforming the input vertices into the screen space. If no other configuration is done, the system expects the output of the vertex shader to map x=-1.0 to the left edge of the viewport, x=1.0 to the right edge, y=-1.0 to the bottom, and y=1.0 to the top. The main role of the vertex shader is to transform the input geometry into that coordinate space. Or, you can just be lazy like my program, and map the input data to that range. The vertex shader can just pass it through without doing anything to it. My vertex shader also passes through the texture coordinate.
The fragment shader will get run once for every pixel that gets touched by the geometry. It is responsible for determining the color of that pixel.
I edited the shaders in the game template like this:
   //  Shader.vsh
   attribute vec2 aPosition;
   attribute vec2 aTexCoord;

   varying mediump vec2 vTexCoord;

   void main()
   {
       vTexCoord   = aTexCoord;
       gl_Position = vec4(aPosition, 0.0, 1.0);
   }


   //  Shader.fsh
   precision mediump float;
   varying mediump vec2 vTexCoord;
   uniform sampler2D tsampler;

   void main()
   {
       gl_FragColor = texture2D(tsampler, vTexCoord);
   }
These shaders match the configuration of the input geometry and texture. To get anything out on the screen in OpenGL ES 2, you have to have shaders, and the configuration of the shaders and the drawing all have to match.
Drawing
Since the scene never changes, and the texture updating is already done, the draw routine is trivial.
   - (void)glkView:(GLKView *)view drawInRect:(CGRect)rect
   {
       glDrawArrays(GL_TRIANGLE_STRIP, 0, 4);
   }
Debug it
This is a good time to use Xcode's tools to make sure there aren't weird lurking issues. Some tips about that are found here.
You can alse read the debug section from the Cocoa port for details about a bug that was very difficult for me to track down.
Download
This download is a bundle of my platform, machine, and emulator code to this point. This project doesn't contain the ROM files, you'll have to find those and add them to the project yourself. (To start just google "invaders.g".) When you do, this code should run the game in the Attract mode. Pretty exciting!
Use the code for reference, but please try to write your own. You may do things better than I do it, but you almost certainly won't learn if you don't try to do it yourself.
My code up to this point is in the github project under iphonePart3-Attract
← Prev: iphone-port-pt-2---machine-object Next: xcode-debug-tools →Post questions or comments on Twitter @realemulator101, or if you find issues in the code, file them on the github repository.